Building Your Best Pedalboard: From Gain Stage to Spacey Soundscapes
Building Your Best Pedalboard: From Gain Stage to Spacey Soundscapes
Learn the ideal pedal order, pro tips for swells, and gear picks to shape your tone—from the JHS Gain Stage to lush ambient effects.
Great tone isn’t an accident — it’s the result of the right gear, the right touch, and the right tools to shape your sound. Guitar pedals are one of the most powerful ways to add personality and versatility to your playing. Whether you’re after a subtle boost, a warm vintage crunch, or an atmospheric wash of delay and reverb, pedals help you dial in a sound that’s uniquely yours.
One of the most exciting new tools to hit our shelves is the JHS Gain Stage — a pedal designed to give you ultimate control over your tone, from a clean push to a gritty drive. But before we dig into what makes it special, let’s talk about how pedals work together to create your signature sound.
[products=blog_gainstage]
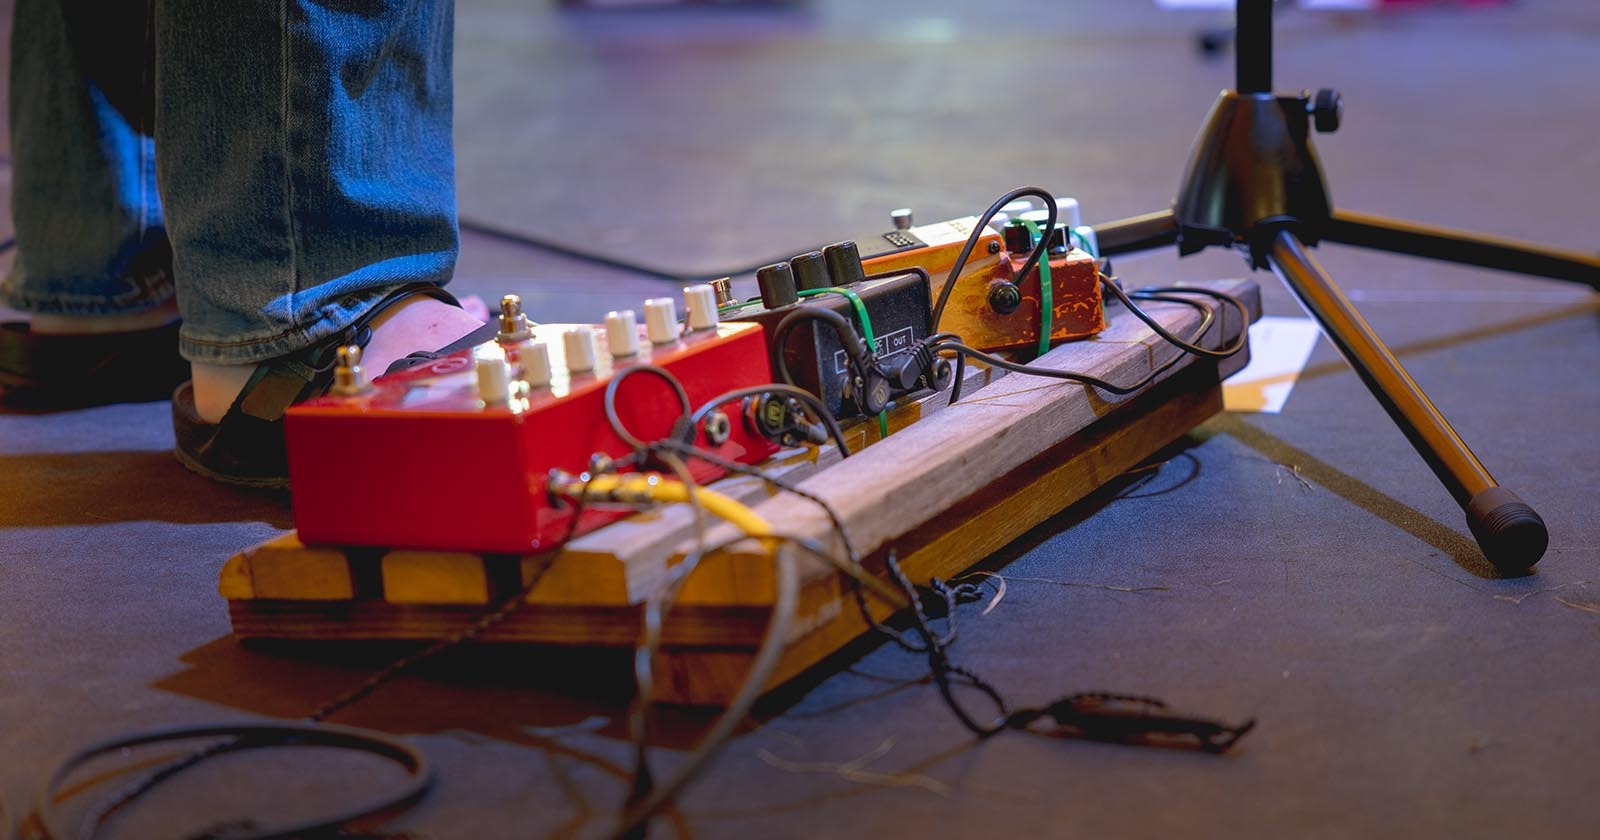
Pedals Are Personal
A single pedal can shape your tone, but the real magic happens when you combine several into a pedalboard. The order you place your pedals in the signal chain has a huge impact on how they sound — a delay before distortion behaves very differently than a delay after distortion.
The thing is, pedal setups are as unique as the players who build them. Your role in a band (or in the studio) often determines the tools you need. For example, my own pedalboard leans heavily on reverb and delay because, more often than not, my job as a guitarist is to create rhythm and ambience — almost like a keys player building a lush bed of sound for others to sit in. I focus on texture more than lead lines, so spacey effects are at the heart of my rig.
Your setup might be the opposite — maybe you’re the lead guitar hero who needs multiple gain stages, or the funk player who lives for a great compressor and a touch of modulation. Whatever your style, there’s a tried-and-true starting point for pedal order that keeps your tone clear and your effects sounding their best.
The Stages of a Pedalboard
While there’s no absolute “right” way to arrange pedals — experimenting is part of the fun — most players start with a proven signal flow that keeps their tone clear and their effects working together instead of fighting each other. Here’s a reliable stage-by-stage breakdown:
1) Tuner — Your First Stop
- Why First: Your tuner works best when it gets a clean, unaffected signal straight from the guitar.
- Pro Tip: A pedal tuner at the start of your chain also acts as a mute switch for silent tuning.
2) Compressor — Controlling Dynamics
- Purpose: Smooths out volume spikes, adds sustain, and helps your notes ring evenly.
- Placement: Early in the chain so it can shape the raw guitar signal before other effects alter it.
3) Drives — Boost, Overdrive, Distortion, Fuzz
- Purpose: Adds grit, warmth, or full-on crunch.
- Gain Staging Tip: Stacking two overdrives (or an overdrive plus the JHS Gain Stage) can give you a wide range from light breakup to saturated lead tones.
4) Volume Pedal — Master Control
- Purpose: Lets you adjust overall output without changing your gain settings.
- Placement: Often placed after drives so you can clean up or swell your tone without affecting how hard you’re hitting your overdrives.
- Pro Hack: I like mine between drives and time-based effects. This way, when I roll back the volume for swells, the reverb and delay continue to ring out naturally. It smooths out chord changes and creates seamless, pad-like textures between swells — perfect for ambient rhythm playing.
5) Time-Based Effects — Reverb and Delay
- Purpose: Creates depth, space, and ambience.
- Why Later: Placing delay and reverb toward the end means your repeats and echoes are clear and not distorted by gain pedals.
6) Modulation — Chorus, Phaser, Flanger, Tremolo
- Purpose: Adds movement and texture to your sound.
- Common Placement: After time-based effects for a lush wash, though some players like them before delay for a different vibe.
Quick Note: This order isn’t law. Pedal order changes tone — for example, putting delay before distortion creates a gritty echo instead of a clean repeat. Use this as a starting point, then experiment until it feels like “your” sound.
Don’t Forget the Board and Power
Knowing your pedal order is just the start — you also need a solid way to mount and power your pedals so they’re ready for stage or studio.
Pedalboards: A good pedalboard keeps your setup organized, secure, and easy to transport. Something like the D’Addario XPND Pedalboard is a great choice because it expands to fit your collection as it grows. Whether you’re running five pedals or fifteen, having them locked in place and neatly cabled will save you setup time and headaches.
Power: Pedals can run on 9V batteries, but for a permanent board, a reliable power supply is a must. Batteries die fast and can leave you in silence mid-set. A high-quality supply like the Strymon Zuma delivers isolated, clean power to each pedal, reducing noise and ensuring consistent performance.
Whether you start small or build out a fully loaded board, investing in a sturdy pedalboard and a quality power solution will make your rig more reliable, more portable, and easier to manage.
Watch: Building a Pedalboard
Want to see a pedalboard come together in real time? In this video, I walk through building a board from scratch — covering layout, wiring, and power.
From Gain Stages to Spacey Soundscapes
At the heart of my own setup, I like to run an “always-on” light gain pedal — something in the Klon family — to give my tone a touch of warmth and harmonic richness. For a similar flavor, I’d recommend the JHS Morning Glory, one of the most transparent and dynamic overdrives out there. It’s perfect for keeping your sound lively without overwhelming your core tone.
When I need to step forward for a solo or add grit, I kick in a second stage drive. My personal board has a Prince of Tone for that, but in our lineup, the EarthQuaker Devices Special Cranker Overdrive or a great fuzz will give you that extra push to break through a mix.
For delay, it’s hard to beat the lush, deep tones of the Strymon Timeline — incredibly versatile, from tight slapback to ambient, cascading repeats. Pair that with the Eventide Blackhole for massive, cinematic reverbs, and you can create a sonic atmosphere that feels like you’re painting with sound. If you want it all in one box, the Eventide H90 delivers world-class effects across the board.
Now, I know those are on the high-end side, but don’t let that discourage you — there are fantastic affordable pedals and multi-effects processors like the Line 6 HX Stomp that can cover every stage of your pedalboard in one unit.
And here’s the truth: great tone always starts with the player, the guitar, and the amp. Pedals are there to enhance and inspire, but your touch, your instrument, and your amp set the foundation. Find those core sounds first, then let pedals take you further.


